How Efficient is your Air Conditioner?
Learn 3 proven methods to calculate your HVAC's energy efficiency and operating costs in Houston
Calculating Energy Costs with Real HVAC Equipment
Alright, so you've made it to the end of our HVAC energy efficiency discussion, and now that you have a good understanding of this whole HVAC efficiency thing, how about we perform a little experiment and take all that we have learned and calculate some energy costs ourselves with a real air conditioner?
We're actually going to cover a few different ways of performing energy cost calculations today in order to compare exactly which method is most accurate and also show the differences between what's listed on labels and actual energy consumption. Keep in mind, all of these methods are still technically predictions based off of real data, but it's still interesting to see just how accurate the official energyguide labels are when compared to actual performance readings.
Method 1
Data Plate Calculations
Method 2
SEER Rating Method
Method 3
Multimeter Measurements
So grab your calculator, sit down, strap in and hold on because the results may surprise you as we examine the accuracy of these 3 different methods for calculating energy costs.
Method 1: Calculating Energy Costs with HVAC Equipment Data Plate Labels
So our first method of calculating the cost of operating our HVAC equipment involves collecting the electrical data that is actually listed on the HVAC equipment itself. We're going to be looking at an 18 SEER American Standard 4 Ton Condenser made in 2006, and based on the data that's printed on the label we're going to calculate the cost of running the equipment over a period of time.
First things first, in order to start calculating energy cost, we first need to figure out how much energy we are consuming, which means we need to gather some electrical data from our outdoor condenser, including the Voltage, Amperage, and Wattage.
Most of this information is labeled on data plates, except Wattage!

Different manufacturers place their data plates in different spots on their equipment, luckily for us, ours is easily accessible on this American Standard.
Finding out our HVAC equipment's Wattage (Power) is our main agenda here, once we have our HVAC equipment's Wattage, we can easily figure out how many Kilowatt Hours worth of energy the unit is using. But as mentioned earlier, Wattage usually isn't listed on our HVAC equipment, but that's ok, right? Because if we think back to earlier where we discussed how to calculate Wattage, we can see it's simply what we get when we multiply Amperage by Voltage.
Even if Wattage isn't listed, we can calculate it ourselves by multiplying Amperage × Voltage
Power Formula
Watts = Voltage × Amperage
So let's gather the Amperage and Voltage data we need to perform our calculation from the outside condenser unit, and determine just how much it's going to cost us to operate our outside unit based on what's listed on the data plate below:

All the information we need to calculate cost of electricity is listed on the data plate of the equipment.
If we examine the data plate of the American Standard condenser above, we can easily extract both the Amperage and the Voltage from all the electrical components that make up the unit. We can see Wattage isn't listed on this piece of equipment, but that's ok because we can calculate Wattage by multiplying Amperage by Voltage.
If we take a look at the red highlighted area in the picture, we can see all of the electrical components that make up the electrical load of the entire condenser, which are each separately listed - The Compressor is listed as "COMPR. MOT", and the Outdoor Fan Motor is listed as "O.D. MOT".
Next to each component listed on the data plate is also its respected rated Amperage, which is listed as "RLA" and "FLA", and next to the amperage we'll notice the Voltage, which is listed as "208/230 V".
"Wait a minute... What is RLA and FLA again? I thought we were looking for Amperage?"
RLA and FLA are amperage approximations, and are technical ratings which are referring to Underwriters Laboratory test results performed at the factory where the labeled components are designed and tested. Technically, they may or may not be the exact amperage the component is actually using during operation.
RLA stands for "Rated Load Amperage" and essentially is an approximation of what the maximum amperage should be when the compressor is operating under maximum load conditions, which usually isn't the exact case - Actual amperage is typically lower than what's listed as RLA for compressors, and actually changes depending on the evaporator coil's temperature, the condenser coil's temperature, and the line voltage.
FLA stands for "Full Load Amperage", and technically it's the same definition as RLA - FLA was changed to RLA in 1976. It's typically listed for outdoor fan motors because unlike compressors, outdoor fan motors are very likely to be much closer to their FLA ratings because fan motors are designed to move a constant amount of air across the condenser's coil.
So for this Data Plate energy calculation, we are going to be using the RLA and FLA ratings that are listed on the condenser's data tag, which means we are calculating cost based on maximum load conditions.
"Ok.. Well what about the Voltage? It says '208/230 V', what does that mean?"
The Underwriters Laboratory requires that manufacturers of electrical devices list the specific voltage tests the device was tested and confirmed to operate within. A voltage label of 208/230 V tells us that the motor has been run under 2 separate tests: One test confirming the motor will operate with a supply voltage of 208 Volts, and another test confirming the motor will operate with a supply voltage of 230 Volts.
Why 2 tests? When electricity comes into our homes from the power company it's usually not exactly 208 volts or 230 volts - Most homes in the United States actually get supply voltage at around 240 volts. The label is indicating a range of tests have been performed that actually verify that the component will operate within plus or minus 10% of what is actually listed on the label.
Since most homes receive somewhere around 240 volts as supply voltage, we are going to round our voltage to 240 Volts for our Data Plate energy calculation.
Let's take a look at the data we need to focus on from the American Standard Condenser:
American Standard Allegiance 18 Condenser Data
| Component | Amperage | Voltage |
|---|---|---|
| COMPR. MOT (Compressor) | 17.6 | 240 |
| O.D. MOT (Outdoor Fan Motor) | 2.8 | 240 |
With the above information collected from our outside unit, we can now figure out how much energy our entire condenser consumes at maximum load. Because we only have Amperage and Voltage without the Wattage for each component, we are going to have to calculate the Wattage ourselves.
Compressor Wattage Calculation

Outdoor Fan Motor Wattage Calculation

Total Condenser Wattage

Convert Condenser Watts to Kilowatts

Convert Condenser Kilowatts to Kilowatt Hours
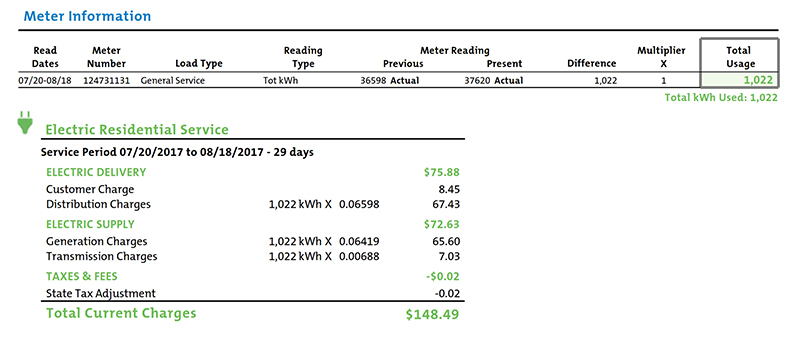
Gathering Kilowatt Hour Cost Information from Your Electric Bill
So now that we know exactly how many Kilowatt Hours our outdoor condensing unit uses, we need to find out how much we're paying the electric company per Kilowatt Hour worth of energy we use, right? In our Taxi example this would be like determining how much we pay the taxi company for each mile we travel.
The easiest way to do this is to examine your electric bill. Now, electric bills can be pretty confusing to figure out on their own, let alone all this stuff we're calculating today, but electric bills get complex because electric companies change the cost of a Kilowatt Hour depending on the day, location, and other variables that they list on the electric bill.
So, what we're going to do is take the total amount of our electric bill shown below, and we're going to subtract all the base fees, surcharges, taxes, and any previous credits or outstanding balances and essentially strip our electric bill down to pure energy charges.
Electric bills can be confusing!
So, let's take a quick look at our electric bill above, and locate the information we're going to be using, and separate it from the information we're going to be stripping out, such as taxes, base charges, and surcharges.
We can see right from the beginning that our total charge for the month is $148.49, but this total includes the taxes, which are not apart of our energy usage, so let's go ahead and subtract the $0.02 we paid in taxes from our total and remove the taxes from the equation, as well as the Customer Charges fees of $8.45:
Isolating Energy Charges on our Electric Bill
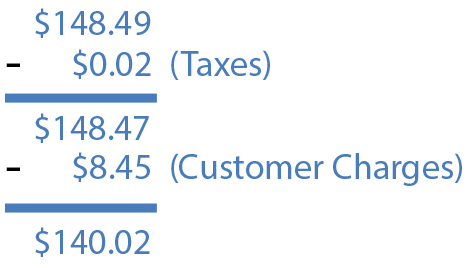
We're subtracting all the extra fees from our electric bill to isolate how much we paid on energy usage alone.
Calculating How Much We Pay Per Kilowatt Hour
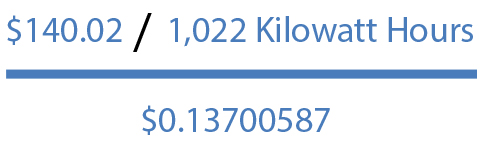
So, after dividing our total energy cost by the total number of kilowatt-hours we used for the month, we arrive at a really long and ugly number of $0.13700587084148727984344422700587 per Kilowatt Hour. Which, for the sake of simplicity, we are going to go ahead and round to $0.14 cents per Kilowatt Hour from now on.
So, we're paying $0.14 cents a Kilowatt Hour, now what?
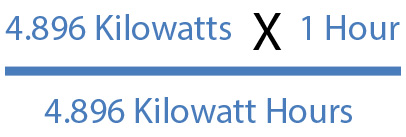
Now that we know how much we pay the electric company per kilowatt-hour used, how about we calculate how much we pay per hour that we run our outdoor unit? If we look back to how many Kilowatt Hours worth of energy our outdoor condensing unit used, we can see that it was using right at 4.896 Kilowatt Hours worth of energy per hour. So let's go ahead and multiply our outdoor unit's energy usage of 4.896 Kilowatt Hours by the $0.14 cents we pay the electric company when we use a single Kilowatt Hours worth of energy:
Method 2: Calculating Energy Costs With The SEER Rating
So far we've learned how to calculate the cost of energy consumption for our American Standard condenser based off the information listed on our condenser's data plate, which only listed data gathered by testing the condenser under maximum operating conditions, and ultimately resulted in the maximum prices we should every have to pay for running our condenser.
But there's another rating on the condenser we can calculate energy consumption based off of, and it's probably one you've seen on an energy guide sticker or heard of before when discussing your air conditioning equipment with your AC guy: The SEER rating.

SEER Rating Explained
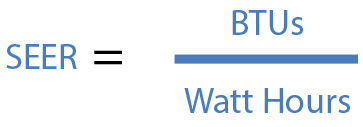
The Seasonal Energy Efficiency Ratio (SEER) is an efficiency rating that is required by law to be listed on cooling equipment and is used to express an air conditioner's performance over the course of a typical summer in the United States. The higher the air conditioner's SEER rating, the more energy efficient the air conditioner should be. It's technically a ratio of the cooling output of an air conditioner measured in BTUs, divided by its electrical input energy measured in Watt-Hours.
Like the RLA and FLA ratings we gathered off our outdoor condensing unit's data plate in our previous calculation, the SEER rating is also another calculation that is determined in a laboratory setting, but instead of gathering data from tests performed under the air conditioner's maximum operating conditions, the SEER rating is based off of a range of conditions that attempt to simulate a summer scenario home owners experience in the United States.
And, although the summer season itself differs depending on where you are in the United States, the SEER rating bases its averaged results off various indoor and outdoor temperatures ranging from 80°F to the 95°F between 40%-50% relative humidity, and tests the equipment under these conditions and simulates an environment that the equipment is much more likely to operate within when it's installed at a home.
It's not a perfect science since summers vary across the U.S., and it's definitely not a calculation that reflects the air conditioner's actual energy consumption, but it does yield much more reasonable results for us to compare the energy consumption of air conditioning equipment to versus simply comparing the RLA and FLA information we collect off of equipment data plates.
So let's go ahead and get started and see how basing energy calculations off SEER ratings compare to our previous example where we based our calculation off of information listed on the data plate.
It's much easier than before this time!
Since the SEER rating is an energy efficiency rating, it's already done most of the math for us, so it's going to be much easier to calculate our cost this time.
As mentioned earlier, the SEER rating is a ratio of our condenser's cooling output measured in BTUs, divided by its energy input in Watt Hours, as shown below:
Since our SEER equation above consists of a SEER rating, BTUs, and Watt Hours, we're going to have to at least collect 2 of these variables to solve for the other. The easiest variables in the equation to collect are the SEER rating, and the BTUs.
If you recall from our Understanding BTUs, Heat, and Heat Transfer section, a Ton of Air Conditioning is equal to 12,000 BTUs, and manufacturers of air conditioning equipment happen to hide the tonnage of the equipment somewhere in the model number of the equipment, which is listed on the data plate. So let's examine our American Standard condenser's data plate, locate the model number, and extract the tonnage information we need for our calculation. If you know your air conditioner's tonnage already, then you can skip this part:
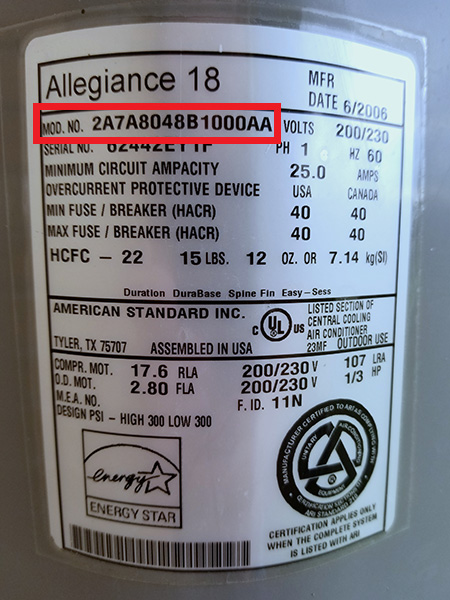
Do you see the tonnage information in our model number: 2A7A8048B1000AA?
Uhhh.. That's a hard, and definite, NO!
Where's the tonnage part listed, again?
Don't feel bad, manufacturers of HVAC equipment "hide" the tonnage information in the model number, so you have to really know what you're looking for in order to locate it because the model number of any piece of HVAC equipment contains a bunch of different information about the unit, and all model numbers are going to differ from manufacturer to manufacturer.
Let's step our way through dissecting the model number to locate the tonnage information so we can understand how to locate it across various types of HVAC equipment.
We know that 1 Ton of air conditioning is equal to 12,000 BTUs, and it just so happens that instead of listing "1 Ton" or "2 Tons" on air conditioning equipment, manufacturers list the BTUs, but they also list it a certain way within the model number.
Residential air conditioning equipment typically comes between 2-5 Tons. Below is a table that converts tonnage into BTUs:
Tons to BTUs
| Tonnage | BTUs | Model Number Style |
|---|---|---|
| 1 Ton | 12,000 BTUs | 12 |
| 1.5 Ton | 18,000 BTUs | 18 |
| 2 Ton | 24,000 BTUs | 24 |
| 2.5 Ton | 30,000 BTUs | 30 |
| 3 Ton | 36,000 BTUs | 36 |
| 3.5 Ton | 42,000 BTUs | 42 |
| 4 Ton | 48,000 BTUs | 48 |
| 4.5 Ton | 54,000 BTUs | 54 |
| 5 Ton | 60,000 BTUs | 60 |
If you examine our table above, you'll see that each ton is exactly 12,000 BTUs larger than the previous, therefore, a ton is equal to 12,000 BTUs, which means if tonnage is listed in BTUs and it's hidden in the model number, then the number we are looking for is obviously divisible by 12,000, or is it?
Most likely not!
At this point, you have to start to think like the manufacturer who has a limited amount of physical space on their label and a ton (no pun intended) of information they want to fit inside a model number that they also have to fit on their tiny label. So instead of listing all of the BTUs, they simply list the first 2 numbers, and shave off all the extra zeros.
So, 24,000 BTUs appears simply as "24" within a model number, and "48,000 BTUs" appears simply as "48" and so on.
So essentially, what you're looking for in a model number to determine tonnage, is a number that is divisible by 12.
Let's look at our American Standard condenser's data plate one more time and zoom in on the tonnage information we're looking for within the model number:
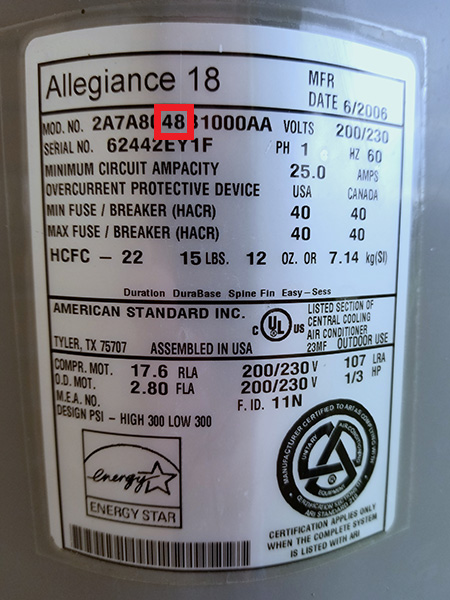
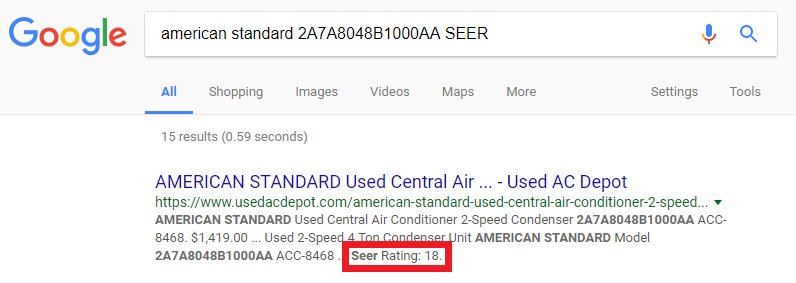
Now that we have located the BTUs in our model number, which is actually listed as 48 but therefore translates into 48,000 BTUs, we now need to locate the actual SEER rating of our condenser, which is required by law to be listed on air conditioning equipment as a bright yellow energy star label like the one shown below.
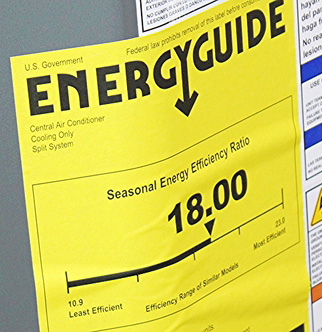
We can see from the picture above that the SEER rating for our condenser clearly rates our condenser at 18 SEER. American Standard was also nice enough to list the SEER rating within our condenser's name: The Allegiance 18. Now, this definitely isn't always the case, especially with other manufacturers who seem to go out of their way to make us really dig for information like this.
And, even though all manufacturers are required to list the yellow energy star tag with the SEER rating clearly listed on it, over time this sticker will deteriorate and fade away because it's made of paper and isn't made to withstand the elements like a data plate is. Often the sticker is also removed by the company who installs the equipment for some reason, I've never figured that one out..
Anyway, so what do you do if you can no longer read or find the bright yellow energy star sticker on your piece of equipment and your SEER rating isn't listed on the data plate like our American Standard condenser?
Unfortunately, if the energy star tag is gone, and the SEER rating is nowhere to be found on your condenser's data plate, you'll then have to reference the model number online, or with the manufacturer and have them tell you what the SEER rating is. So, if this sounds like you, try searching Google for the model number of your piece of equipment first, you should easily be able to find the SEER rating that way, and if not, you can always look through the manual that came with your air conditioning equipment, or call the manufacturer and ask them to tell you what the SEER of your model number is.
Try searching online if you can't locate your condenser's SEER rating, it shouldn't take long to find!
Alright, so we have our BTUs and our SEER rating, now what?
Now that we have both variables off of our American Standard condenser, we can easily solve for the energy consumption the SEER rating testing gathered at the laboratory when the equipment was tested by dividing the BTUs by the SEER rating as shown below:
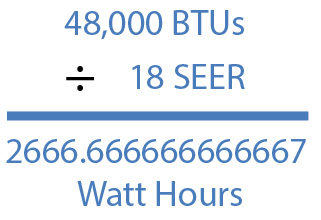
Once again our calculation yields an ugly number of 2,666.666666666667 Watt Hours worth of energy, but, before we round it, let's stop and think real quick. Right now, we have energy consumption based in Watt Hours, but the electric company bases our bill off of Kilowatt Hours worth of energy, so before we round our number, let's first convert Watt Hours to Kilowatt Hours.
Converting Watts to Kilowatts isn't so bad - We know a Kilowatt consists of exactly 1000 Watts, so we simply divide our Watt Hours by 1000 to convert it to Kilowatt Hours. Easy, right? Let's do it:
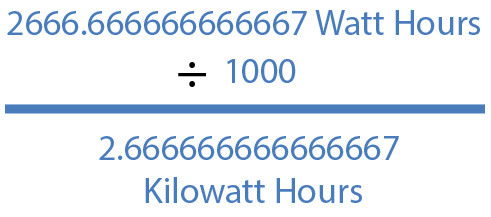
Alright, now that we have converted our Watt Hours into Kilowatt Hours, we can now go ahead and round our 2.666666666666667 Kilowatt Hours to 2.666 Kilowatt Hours just to make life a little easier on us.
Wow, that's a big difference from our previous calculation that we based off of the data plate, which had come out to 4.896 Kilowatt Hours. So based off the SEER rating, we're using about half as much energy this time, and so our energy cost should definitely reflect that change in energy consumption.
Let's go ahead and see how much it costs to run our condenser per hour based off our SEER rating by multiplying our Kilowatt Hours worth of energy consumption by the price we pay per Kilowatt Hour worth of energy used listed on our electric bill again, which is $0.14 cents per Kilowatt Hour.
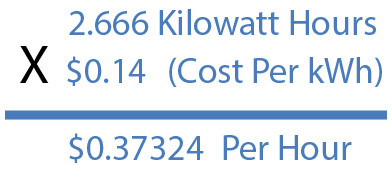
Nice! So just to recap, before we were paying $0.68544 per hour to run our air conditioner when we based our calculations off the condenser's data plate, and now we're only paying $0.37324 per hour when we use the calculations determined by the SEER rating. Let's go ahead and make another cost analysis table and compare both methods, dollar to dollar.
Condenser Run Time Cost Analysis
| Method | Run Time Length | Formula | Cost |
|---|---|---|---|
| Data Plate | Hour | 4.896 kWh × $0.14 = $0.68544 | $0.70 Per Hour |
| SEER | Hour | 2.666 kWh × $0.14 = $0.37324 | $0.40 Per Hour |
| Data Plate | Day | $0.68544 × 24 Hours = $16.45056 | $16.46 Per Day |
| SEER | Day | $0.37324 × 24 Hours = $8.95776 | $8.96 Per Day |
| Data Plate | Week | $16.45056 × 7 Days = $115.15392 | $115.16 Per Week |
| SEER | Week | $8.95776 × 7 Days = $62.70432 | $62.71 Per Week |
| Data Plate | Month | $16.45056 × 31 Days = $509.96736 | $509.97 Per Month |
| SEER | Month | $8.95776 × 31 Days = $277.69056 | $277.70 Per Month |
| Data Plate | Year | $509.97 × 12 Months = $6119.61 | $6119.61 Per Year |
| SEER | Year | $277.70 × 12 Months = $3332.29 | $3332.29 Per Year |
Wow, so what a huge difference that made now that we can see it all out before us in the table. Remember, as stated previously, no one runs their air conditioner for entire months or years at a time, the table is simply something for us to compare continuous run times, and now that we have the data plate calculations next to the SEER method calculations, we can definitely see the difference!
Method 3: Calculating Energy Costs With Actual Readings
Alright, so now it's time to actually measure how much energy our condenser is actually using, and compare it to the cost per Kilowatt Hour on our electric bill!
Now, for this method you'll need a digital multi-meter, and also a reasonable sense of safety around electrical equipment.
SAFETY WARNING
Remember: Air conditioning condensers are typically supplied with 240 volts of power, some are even 460 volts of 3 phase power, so if you're not familiar with measuring electrical readings and electrical safety, now is probably not the time to learn.
Only perform this method if you know what you're doing and how to stay safe around high voltages.
So, with that part out of the way, let's go ahead and discuss what exactly we're going to be doing. This method is very similar to our first method, where we gathered the FLA and RLA ratings off the data plate of our condenser, except this time we're going to gather actual amperage with a digital multimeter that measures the amp draw of our condenser. Then once we have the amperage of our condenser while it's operating, we'll simply repeat the steps we performed in Method 1. Simple, right?
So, if we recall how we calculated our condenser's power before, we simply gathered the Voltage and Amperage data listed on our condenser's data plate and multiplied them together to find Wattage. This time we're actually going to gather this data with a digital multimeter, let's go ahead and gather the supply voltage information we need from our condenser's disconnect box so we don't have to actually open up the unit:

And look there, measuring across the leads shows us that our supply voltage is at 248 volts alternating current. Remember how when we examined the data plate earlier, we saw that our condenser was tested and confirmed to operate at either 208 volts or 230 volts, and our actual reading is 248 volts. Voltage is something that is going to differ at every single home due to the transformer on the pole that's owned by the electric company, and also the distance the electricity has to travel from the distribution center.
Now that we have voltage, let's go ahead and gather the amperage off the condenser using our multi meter and once again gathering the data from the disconnect box:

Our meter shows us that our condenser is drawing 5.9 Amps, and that's interesting, especially if we compare it to the RLA and FLA data listed on the data plate which we used in our first calculation in Method 1 and came in at a whopping 20.4 amps. That's a huge difference from our actual readings of 5.9 Amps.
Factors Affecting Amperage
Now just to be clear, a condenser's amperage is going to vary depending on several factors, the most important factors that determine a condenser's load happen to be:
- The indoor and outdoor temperature
- How clean the evaporator coil and condenser coil are
- The condition of air filters inside of our home
To be fair, our indoor temperature at the moment of testing our condenser is 74 degrees, and our outdoor temperature near the condenser is 82 degrees, both the condenser and the evaporator coil are both 11-12 years old, and neither has ever been cleaned, the air filters however are clean. These combined factors have all lent a hand at forming the amperage readings we have gathered with our multi-meter at the time of testing.
So now that we have both voltage and amperage readings, we now need to calculate the wattage, which means we need to multiply the voltage reading by the amperage reading as shown below:

Awesome, so our condenser is using 1,463.2 Watts of power, which is so far better than any of the other methods we've actually used to calculate power thus far.
Now, if we remember from doing this earlier, the electric company doesn't bill us on power, they bill us on Kilowatt Hours worth of energy usage, so since right now we have Watts of power, let's go ahead and convert our Watts to Kilowatts by dividing our Wattage by 1000:

And once again, our calculation comes in at the lowest we've seen so far at 1.4632 Kilowatts. Let's go ahead and multiply our Kilowatts by 1 Hour to convert it into Kilowatt Hours:

So now we have our condenser's energy usage, which is 1.4632 Kilowatt Hours. We can now calculate how much we pay to run the condenser per hour by taking our condenser's energy usage, and multiplying it by the rate the electric company charges us per Kilowatt Hour worth of energy we use, which is $0.14 cents per kWh:

Excellent Results!
Great! So now we have calculated how much it actually costs to run our condenser per hour, and the results are pretty amazing (Way to go American Standard!) - Our actual price per hour is lower than any of the other calculations we've gone through so far, including the data plate method, and the SEER rating method, awesome!
Let's go ahead and update our cost analysis table to show all 3 methods of calculating costs so we can compare them side by side:
Condenser Run Time Cost Analysis
| Method | Run Time Length | Formula | Cost |
|---|---|---|---|
| Data Plate | Hour | 4.896 kWh × $0.14 = $0.68544 | $0.70 Per Hour |
| SEER | Hour | 2.666 kWh × $0.14 = $0.37324 | $0.40 Per Hour |
| Actual | Hour | 1.4632 kWh × $0.14 = $0.204848 | $0.21 Per Hour |
| Data Plate | Day | $0.68544 × 24 Hours = $16.45056 | $16.46 Per Day |
| SEER | Day | $0.37324 × 24 Hours = $8.95776 | $8.96 Per Day |
| Actual | Day | $0.204848 × 24 Hours = $4.916352 | $4.92 Per Day |
| Data Plate | Week | $16.45056 × 7 Days = $115.15392 | $115.16 Per Week |
| SEER | Week | $8.95776 × 7 Days = $62.70432 | $62.71 Per Week |
| Actual | Week | $4.916352 × 7 Days = $34.414464 | $34.42 Per Week |
| Data Plate | Month | $16.45056 × 31 Days = $509.96736 | $509.97 Per Month |
| SEER | Month | $8.95776 × 31 Days = $277.69056 | $277.70 Per Month |
| Actual | Month | $4.916352 × 31 Days = $152.406912 | $152.41 Per Month |
| Data Plate | Year | $509.97 × 12 Months = $6119.61 | $6119.61 Per Year |
| SEER | Year | $277.70 × 12 Months = $3332.29 | $3332.29 Per Year |
| Actual | Year | $152.41 × 12 Months = $1828.89 | $1828.89 Per Year |
We're Done!
Whew! We're done! And, at this point we've calculated energy costs based on our condenser's data plate, and we've calculated energy costs based on our condenser's SEER rating, but neither of these calculations came anywhere close to the results we saw using our condenser's actual energy consumption, and that's definitely a good thing!
Method Comparison Results
Comparing all three methods shows significant differences in calculated operating costs
HVAC Efficiency Calculation Methods - Cost Per Hour Comparison
| Method | Energy Basis | Cost/Hour | Accuracy |
|---|---|---|---|
| Data Plate Method | Maximum Load Conditions | $0.70 | Highest Cost Estimate |
| SEER Rating Method | Seasonal Average Conditions | $0.40 | Most Realistic Estimate |
| Multimeter Method | Actual Real-World Conditions | $0.21 | Most Accurate (Professional Required) |
*Multimeter results vary based on actual operating conditions and require professional measurement
When to Use Data Plate Method
- • Worst-case scenario planning
- • Maximum load calculations
- • Equipment sizing decisions
- • Conservative cost estimates
When to Use SEER Method
- • Annual cost budgeting
- • Equipment comparisons
- • Energy efficiency assessments
- • General cost estimates
When to Use Multimeter Method
- • System troubleshooting
- • Performance verification
- • Efficiency audits
- • Professional assessments
Key Takeaways for Houston Homeowners
For budgeting: Use the SEER method ($0.40/hour) for realistic annual cost estimates in Houston's climate.
For system evaluation: Professional multimeter measurements ($0.21/hour) provide the most accurate assessment of your current system's efficiency.
For comparisons: Data plate methods ($0.70/hour) help compare maximum potential costs between different equipment options.
The difference matters: Real-world efficiency can be 70% better than data plate estimates, saving hundreds annually.
Actual Results Summary
In this real-world test with an 18 SEER American Standard 4-ton condenser, the multimeter method showed actual operating costs 70% lower than data plate calculations and 47% lower than SEER estimates.